Est. 2020

Fujifilm 150-600mm f/5.6-8 LM OIS WR Lens Review

*This post may contain affiliate links. Affiliate links are links to external websites that provide monetary value to me if you decide to purchase a product on their website. This is at no extra cost to you. For more information, please see the Affiliate Disclosure and the Privacy Policy

Quick Facts about the Fujifilm XF 150-600mm F5.6-8 LM OIS WR Lens

  • Weight: 3.5lbs/1605 Grams
  • Weather Sealed: Yes
  • Filter Size: 82mm
  • Angle of View: 10.8 to 2.7 Degrees
  • Focusing Distance:  7.9’/2.4m
  • Max Aperture: F5.6-F8
  • Minimum Aperture: F22
  • Image Stabilization: Yes
  • Mount System: Fuji X
  • Price: $1,999
  • Zoom: Internal 
  • Accepts Teleconverters*

Table of Contents

Who is the 150-600 F5.6-F8 for?

Since I purchased my first Fujifilm camera, there has been one constant within the X-Mount, the lack of a long, super-telephoto zoom. It didn’t matter if it was third-party or designed by Fujifilm, no native lenses existed. 

It makes sense, after all, for a couple of reasons. 

First, the crop factor of the APS-C sensor. 

Second, and most importantly, the idea of niche lenses. 

Niche lenses are often expensive to manufacture and design, and sales often do not create the same return on investment (ROI) as other standard lenses such as the 23mm F1.4 or 33mm F1.4. This is the reason, despite a small number of XF users persistence, that Fujifilm has not released a prime lens longer than the 200mm F2. 

Now, you might be wondering, “Why would I use the Fujifilm XF 150-600mm lens?” After all, it’s the name of this section. The 150-300 millimeter focal length provides some useful reach for portraiture and sports. However, if your photography style is like mine, you will use this lens “just because.” By pushing this lens towards 600mm (914mm Full-Frame), you can use this lens for bird, wildlife, and creepy street photography. 

Either way, 900mm is far beyond the human eye. So, in order to truly maximize this lens’s output, you have to see beyond the initial scene. (Or be far-sighted like me. The FOV section below shows just how extreme this lens is.)

However, weighing just 1600 grams, this lens is surprisingly light and might be the next best Fujifilm telephoto lens for travel. 

What other lenses cover the 150-600 (APS-C)/229-914mm (FF) equivalent 

So, here’s the skinny on each of these lenses. 

The 55-200 is an okay budget kit lens. 

The 70-300 is the best performing lens in regards to price/performance. 

The 100-400 is highly overpriced and does not have great built quality. 

The 50-140 is the best in regards to sharpness and low-light. However, it just feels a bit expensive. 

The XC 50-230 is not the best. However, you can buy a new lens for $400. 

Prime Lenses

  • Fujifilm XF 200mm F2

I mentioned this lens above as “niche,” but it is not niche because of the focal length. (300mm Full-Frame) Instead, it’s more niche because of the price. 

Nicknamed “The Great White Sharp,” this lens retails for almost $6,000. 

However, this lens’s combination of focal length and aperture allow portraiture, sports, and numerous other styles. 

The skinny for this lens is: 

The Fujifilm XF 200mm F2 is the best performing telephoto lens by Fujifilm, period. Sharp and heavy (5 pounds), it belongs in the red-badge category.

If used with the XF teleconverters, what is the focal length at 1.4x and 2x?

Astonishingly, beyond the 600mm, this lens also accepts Fujifilm teleconverters. (Please note: I have not had the opportunity to review the Fujifilm teleconverters. I have heard about a loss in image quality with the 2x converter. The photo below was just cropped to the 2x equivalent.)

So, first off, here is what a photo of 50mm or the “Human Eye” looks like and what 600mm at the 2x crop looks like. It’s kind of creepy….

To note: 

The Fujifilm 150-600mm combined with the 1.4x teleconverter is approximately 210-840mm. This is a full-frame equivalent of 294 – 1260mm. 

The Fujifilm 150-600mm combined with the 2x teleconverter is approximately 300-1200mm. This is a full-frame equivalent of 420 – 1800(!)mm.

Which Fujifilm Camera Bodies Work Best for This Lens?

With a camera lens this big and long, I also thought I should recommend a few camera lines from the Fujifilm ecosystem. 

In my unofficial opinion, there are two lines that you should consider for the best performance, the X-H and the X-T. 

Both camera lines (since the X-T4) contain Internal Body Image Stabilization, which is integral for this lens. However, both lenses also contain larger grips that will make for easier handling. It’s important to note this lens is going to dwarf either body; however, it’s just something to consider. 

If you find these camera bodies too uncomfortable, you could always purchase a tripod. (With a focal length of 600mm and an aperture of F8, this might be required for some.)  And to note, the tripod foot included is Arca-Swiss compatible. 

For all of the photos on this 150-600 review (except for the sharpness test), they were actually handheld with the X-T4 and no battery grip. For balance, I held onto the tripod foot on the bottom. However, I really don’t recommend it.

Dials, Switches, Buttons, Tripod foot, and More

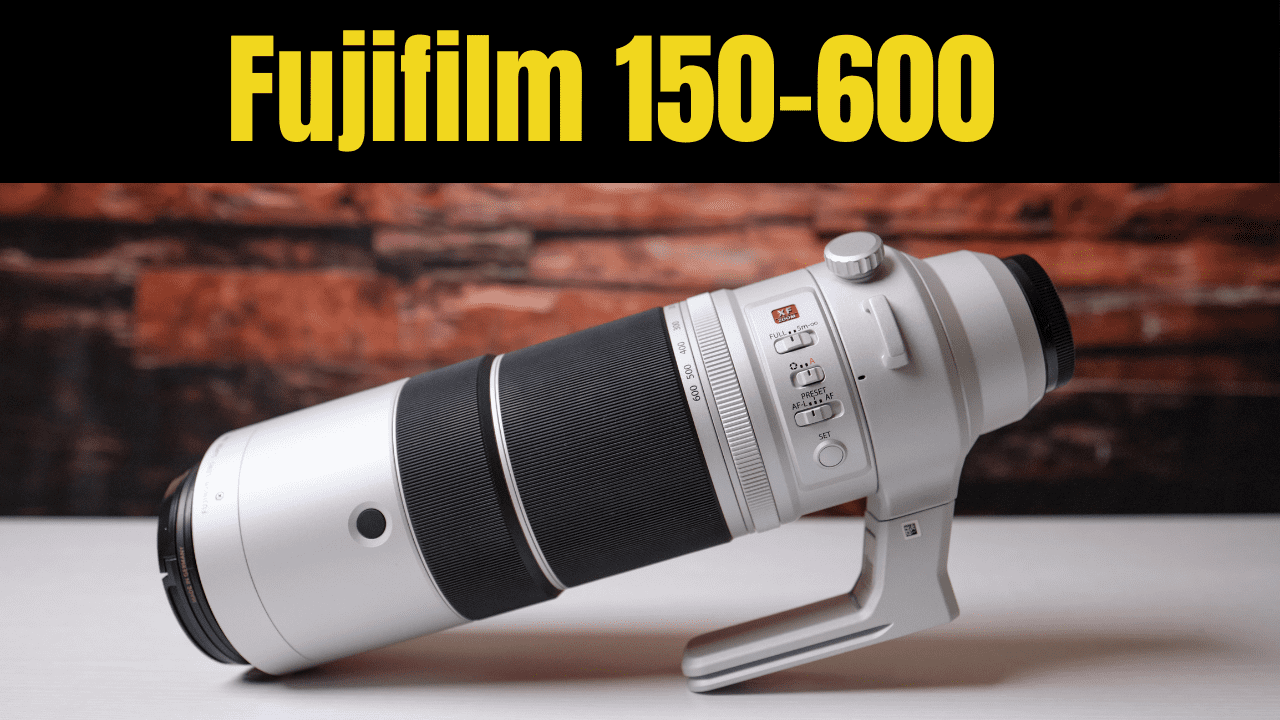
On the 150-600, there are a couple of switches, buttons, dials, etc. that I felt I should mention. They greatly affect the functionality, and with something such as an X-T4, it gives the impression of a full-analog experience. 

The owner’s manual can be found here; however, here is what’s present on this lens

Switches

  • Focus Range Selector (Focus Range Limiter)

For a conversation about missed shots, and why I always select the “Full Length” setting on this lens, please see the 100-400 review. (Spoiler alert: It’s just in case something flies closer than 5 meters to you. 5 Meters equals 16.4 feet)

If you want to use a focus range limiter, the 10-24mm review contains instructions and definitions. 

  • Aperture Mode Switch 

For a lens with this aperture range, you are not going to want to leave the aperture or the shutter speed on automatic, ever. (Especially the Shutter Speed) When in doubt, leave the ISO on auto despite the risk of more grain within the photo. 

  • Focus Selector 

I recommend keeping this switch extended to the far-right. (Away from AF-Lock or Autofocus Lock)

Buttons

  • One Focus Preset Button
  • 4 Focus Control Buttons

Honestly, I never used these. But it’s nice to know they are there! 

Extras 

  • Shoulder Strap Eyelet

The raised bump on the lens is not actually there for aesthetic. Instead, it’s to provide a bit more balance for shoulder straps and cameras. 

  • Lens Hood

The lens hood is plastic; however, it’s solid. As a bonus, this lens hood has the ability to unlock with a button. When I first saw that, I thought: “Great, just one more thing that could break.” However, lense caps are made of plastic, and they don’t break. 

This lens hood also has the ability to remove lens filters via a small filter access port. Be careful to not catch your fingers!

  • Tripod Foot

We have a removable tripod foot that is arca-swiss compatible. To remove the tripod foot, twist the knob located on the foot.

What things are we missing?

  • Marked Aperture Ring 
 

There are two ways to get around the problem of missing a marked aperture ring. (It’s not that big of a deal, if you ask me.) First, the aperture ring does work, so you will have to look at the screen when you rotate it. OR program the rear or front command wheel. 

  • OIS-ON/OFF switch 

This button has been missing on all newer Fujifilm zoom lenses. And instead, you can turn this OIS ON & OFF in the camera body via the settings.

Build Quality Review

First off, this 150-600mm has weather sealing, which should lead to a longer life-cycle for this product. (Depending on how you use it…. Don’t incessantly take it to waterfalls.)

However, the build quality is quite good. It is made out of a magnesium-alloy.  Comparing it to other lenses, it rates similarly to the 70-300 and WAY better than the 100-400. 

Honestly, I would have no problem carrying this lens around the world. 

It’s important to remember that this lens is an internal zoom. It contains twenty-four elements in 17 groups. And did I mention that it only weighs 3.5 POUNDS? (1600 grams)

If you are looking for an aesthetic or vibe that this lens gives off, note that you will be seen as a professional. Judging by the looks people gave me as I walked by, people were very impressed with the lens. (OR I am really good looking ;)) More than once, I was stopped while I was walking and asked about the lens.

Fujifilm 150-600 FOV Sample Images

Here are just a few more photos that show you the field of view for this lens. 

Please note: The iPhone 13 photo @ 51mm is approximately the focal length for the human eye. (Not including peripheral vision.)

As you can see, the range is quite impressive. (If not creepy.)

At which focal length does the aperture change on the Fujifilm 150-600?

150mm 

185mm 

316mm

539mm

@F5.6 

F6.4

@F7.1

@F8

This lens is the most difficult lens I have ever used, and it’s mainly because of the aperture range. As seen in the chart above, by 316mm, our maximum aperture is F7.1…. 

That isn’t a problem if we are shooting in middle-of-the-day conditions. However, starting around two hours BEFORE Golden Hour, we are going to start raising our ISO’s to dangerous levels. (Grain is not always bad, and I notice it less than other people.)

With this lens, you also throw a different variable into the equation, the focal length. There is an old saying, “In order to have sharp photos, your shutter speed needs to be double your focal length.” So, for this lens, at 600mm, your shutter speed needs to be 1/1200. That…… is borderline insanity. 

Sure, you are going to use the 5 stops of Optical Image Stabilization. (There is a poor-quality video of that below) However, the use cases for this lens could be limited. With the insurmountable reach, I expect this to be a boon for wildlife and bird photography. However, I know most photographers who specialize in those styles are up early. In order to truly get sharp pictures, you are going to need a tripod. BUT

What is the Exposure Triangle 

(Skip this section and jump straight to the sharpness test below if you aren’t a newbie.)

Exposure Triangle Explained

To be honest, the exposure triangle deserves an entire blog post. So, I will skip the tutorial for now. However, for beginning photographers, here’s what we need to know. 

#1 The exposure triangle follows laws of inverse and correlating effects.

#2 The Exposure Triangle is “supposedly” how one properly exposes a photo. However, as you progress in your photography journey, you will start noticing different things that will affect your exposure i.e. shadows.  

#3 Your editing style is going to drastically impact the way you approach the exposure triangle. 

#4. When you’re first starting out, bracket your images.

Fujifilm 150-600 Brick Wall Sharpness Test

From my initial impressions, I was very happy with the sharpness and contrast of this lens at all focal lengths. With the 150-600mm zooming (internally!) over 400mm, this lens is not an easy one to manufacture OR engineer. 

Let’s focus on the top-left corner of these photos to show the image sharpness and more detail. 

Please note: This was cropped from a 20.80 inch by 13.86 inch rectangle to a 7.45 inch to 7.45 inch square focused on the top left. I made some minor exposure tweaks compared to the photos above. 


I have a few takeaways from these photos. 

  • It appears that the lens’s sharpness peaks at F8. (For all Focal Lengths)

  • I noticed a slight fall-off around 500 millimeters. If you bounce between the photos labeled 502mm @F8 and 391.4mm @F8, focus on the line of bubbles above the mortar joint. You will see the reduction in sharpness. 

  • I was mostly happy with the lens sharpness. I don’t expect to be taking too many photographs of brick walls at F11. However, it’s nice to know if I need to, I can. 

Bokeh Performance 

For the bokeh’s transition from foreground to subject and subject to background, I found the results to be very pleasant. (Really, it’s great all-around.) However, if I had to describe the bokeh using one word, it would be “natural.” 


As seen in this photo combination, despite the aperture of F8, with a focal length this long, we can still receive some shallower depth-of-field photos.

Bokeh Balls Review

I’m not going to lie, testing the 150-600 was the first-time I have ever used a super-telephoto zoom lens. And just like the bokeh test above, I was pleasantly surprised by the results and shape of the bokeh balls. At all apertures, you will be able to achieve mostly round bokeh balls. However, here’s three quick takeaways. 

  • At F5.6, the bokeh balls suffered from a large amount of cat’s eye in the corner. 
  • At F11, the bokeh balls started to develop a slight hexagonal shape. You really have to zoom in on it; however, it’s there. (You might be wondering, why would I care what the bokeh balls look like at F11? And the answer is… I don’t know.)
  • This lens did not have any onion-ring effect.

Photo Autofocus Performance 

Although the YouTube compression resulted in poor image quality, as seen in the video above, the autofocus was able to hit on every single photo with a moving subject. (And camera lens.)

These photos were shot at 15 FPS with the mechanical shutter, and I was very much limited by the buffer with my UHS-I Micro-SD card.

Also, the camera settings were face-detect on.

Video Autofocus Performance 

  • Any Eye
  • Tracking Sensitivity +2
  • Autofocus Speed +3

The autofocus was quick, silent, and I found that there were no major issues when I jumped in-and-out of the frame. 

However, the autofocus, as I express in all of my reviews, are limited by the X-T4. 

Fujifilm OIS Test

Here is a combination of the OIS and Bokeh Balls Test. 

The OIS is needed for this lens, so let’s talk about it. 

According to Fujifilm, this lens provides up to 5 stops of image stabilization. 

Because it weighs only 3.5 pounds, it sounds very appealing to just carry this lens and a larger-grip camera. Could you realistically hand-hold photos and videos? Yes, everything except the brick wall test in this test is hand-held. 

However, I highly recommend making sure you use either a monopod or tripod. With each focal length change towards the end, the shake is going to be magnified. If I was telling you this lens, I would say have a plan, just in case. 

Examining this lens’s particular OIS, I found it to be a bit jerky when I was panning. However, that’s what I expected. I have no complaints about it.

Macro Performance and Focusing Distance 

The 150-600 has a focusing distance of 7.9 feet (2.4 Meters), and the maximum magnification ratio is .24x. This, combined with the sneaky good “natural” bokeh, means you could get away with some macro photography. Sure, it’s not exactly designed for it, nor does this lens have the close focusing distance of the 70-300, however it’s good enough for me. 

If you really want some unique results, push the focal length to its most extreme, use F8, and get as close as you can to the subject. Trust me, you can get some awesome photographs.

Sunstars Review

I mean….. I don’t know what I expected from this lens in regards to sunstars. 

I was not disappointed, and I was not impressed. 

On the bright side (pun intended), the lens handled ghosting and flaring well. 

Pros of the 150-600

  • Good Focal Length Range

Look, there is no question, that this lens will be one of the most useful lenses for outdoor photographers. 

  • Light
This lens is extremely light. Plus, it’s an internal zoom
  • Price

I’m always the first person to complain about price. At $2,000, it seems a bit steep. However, as you examine the build quality, I think the price is worth it. 

Cons of the 150-600

  • Aperture Range

Look, there is no question that this lens is very useful in the right circumstances. However, in order to maximize this lens’s performance, you will need to know those circumstances. 

Unfortunately, you will need to know this lens is going to struggle for the first few and last few hours of the day. 

Also, whenever you are looking at this lens, note that the focal length will also play a role in the shutter speed you use. 

  • It looks expensive and is massive

This is both a pro and con. However, you will not be able to blend-in. Most people associate the color white (silver pearl) with expensive camera lenses. 

Final Notes

Quite honestly, this lens is the best in it’s class. I highly recommend it over the 100-400. If you were looking  to pair it with another telephoto zoom for low-light, I would recommend the 50-140. (Although that lens is expensive too.)

The only downfall is the aperture and the knowledge that the photographer needs to effectively use this lens. If you’re invested in the X-Mount and interested in this lens, I think it’s a no-brainer. 

My Rating 

Price: 4/5
 
Do I wish it was $200 cheaper? Yes, absolutely. However, it is good enough for $2,000. Additionally, full-frame 70-200 F2.8’s still often cost a couple hundred dollars more than this lens. 

Reliability: 4/5

The points are lost mainly due to low-light. It can be worked around with by using a tripod, however.  (-1) Additionally, we lose some points for sharpness. (-.5) That being said, we do It has a very effective OIS system, which actually gives it half-a-point back. (+.5) 

Functionality: 5/5

One of the largest FOV changes in a camera lens that I have ever seen. 

Style: 5/5

Looks good. Looks Expensive. Seriously, it might be the best-looking lens I have ever used. 

Total: 18/20 or 90%